Application Import Process
Importing (or re-importing) your applications is the first step in the mapping process. AceMapper supports three physical file types: Microsoft Access databases, Microsoft Excel worksheets and Delimited Text files. A series of screens (sometimes called a wizard) steps you through the import process.
From the main menu, select File | Import Applications… to begin the process. This will bring up the standard file open dialog.
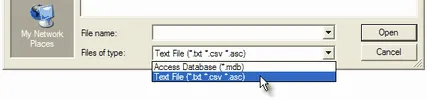
Once you have selected the desired file, press the Open button to begin the import process.
Define Text File Format
If importing a text file, the first screen in the import process is used to define the overall structure of the file you are importing. The choices are Tab Delimited, Comma Delimited or Other Delimited. (This screen is not displayed when importing an Access table.)
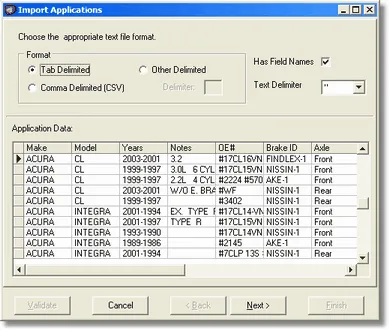
To use the Import Applications screen (first page):
- Select an option in the Format section. If you select Other Delimited, you must also supply a delimiter (e.g. a vertical bar character). There may be a pause while the application data is retrieved and re-displayed using the new delimiter to separate the fields.
- Check the Has Field Names check box if the file you are importing has a list of field names as the first record in the file. Otherwise, leave this check box empty.
- Use the Text Delimiter drop-down to select the character used to indicate that the field is a text field. This is either a single or double quote character. If no character is used for this purpose, select (none) from the list. Standard CSV files from Excel use a double quote character for this purpose.
- Press Next to go to the second page of the import process.
Note: If your comments are imported with quotes around them, you should select a Text Delimiter and re-import.
Define Import Columns
The next screen in the import process is used to identify the information contained in each column in your file.
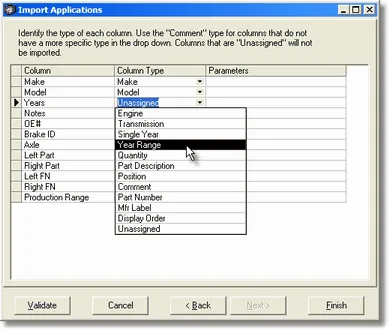
Each column in the file to be imported becomes a row in the Identify Columns grid. The Column Type for each column is initially set to “Unassigned.” If you want the system to import a column, you must change it to one of the predefined column types (otherwise it will be skipped).
Note: The first time you import into a new document, the Column Types will be Unassigned. When you perform subsequent imports using the same file definition, the system will remember the Column Type and Parameters.
Choosing a Column Type
See What do the different Column Types on the import screen mean? for a table describing every Column Type and the parameters it supports.
Tip: You often have a choice whether to create Engine columns or make them Comment columns. A good rule of thumb is to include only “engine base” information in Engine columns (multiple columns will be concatenated together). It is much easier to map displacement information from the Engine mapping screen than from the Comment mapping screen, because it doesn’t always match exactly.
Comment Column Parameters
If you use a Comment Column Type, an ellipsis will be displayed in the Parameters column. Press that button to display the Comment Column parameter screen.
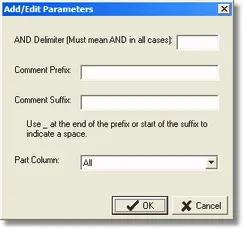
Using the Comment Column Parameter screen:
-
Enter the single character that you use in this comment column to represent an AND. Typically, this will be a semicolon or a plus sign. See the important note below. If in doubt, leave it out.
You can also enter multiple characters to split on more than one character. For example, if you use both a semicolon and a plus sign to separate ANDed comments, you could enter
[;|+]in this field. When the system encounters either of those characters in a comment column, it will split the comment into multiple comments on the same application to indicate an AND condition. If the delimiter must have a space after it, include<space>(if a semicolon, for example, had to be followed by a space to be split, enter;<space>).If you don’t enter an AND delimiter, the system will treat the entire contents of the comment column as a single comment on the application.
Important: Do not supply an AND delimiter unless it applies to all occurrences of that character. If a semicolon is sometimes used instead of a comma, for example, the system will include those comments on the same application when they really should be put on separate applications to indicate an OR condition.
For example, the following expression uses a semicolon to separate an ORed expression:
Auto Tran From Engine #46K 61256; Man Tran From Engine #46K 02980 -
Enter Prefix and/or Suffix text to the comment column. An underbar character will be translated to a space, so an
OE#_prefix on a column with12345would create a comment ofOE# 12345.Many times a comment depends on a column heading to identify what it means. For example, you might have an OE# column that just lists numbers. If those numbers were combined with other comments, you might not know what they were. The Prefix and Suffix fields let you add identifying text to the front or back of the data.
-
Select a Part Number Column that this comment should apply to. The default is All part columns. (You must define a part number column before any will appear in this drop-down list.) This selection applies only to Structured files with multiple part number columns defined. It is particularly useful for footnotes that apply to a particular part number.
Part Number Column Parameters
If you use a Part Number Column Type, an ellipsis will be displayed in the Parameters column. Press that button to display the Part Number Column parameter screen.
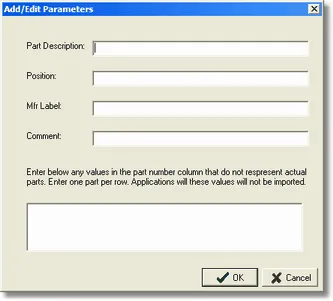
Using the Part Number Column Parameter screen:
- Enter a Part Description for this part column only if you don’t have a separate Part Description column defined for the file. This Part Description will appear on the Part Description Mapping screen.
- Enter a Position if the Part Number column always applies to a position on the vehicle. This option should normally only apply when you have two or more part number columns defined — for example, Left and Right part number columns. This position text will appear on the Position Mapping screen.
- Enter a Mfr Label if the Part Number column always applies to a particular Mfr Label. This option should normally only apply when you have two or more part number columns defined — for example, Economy and Premium part number columns. This Mfr Label text will be combined with any other Mfr Labels resulting from Part Description Mapping or Comment Mapping for an application.
- Enter a Comment if the Part Number column always applies to a particular comment. This option should normally only apply when you have two or more part number columns defined — for example, w/AC and w/o AC part number columns. This comment text will appear as a separate comment on the Comment Mapping screen.
- Enter any text values that might appear in the data for this Part Number column that you want to skip. Put one value per row in the text box. Example values might be
NA,NR, and a hyphen.
Import Process
It is a good idea to check the input file for correctness by pressing the Validate button. No applications are actually loaded during this validation check, but all of the records are read and compared against the column type rules. A listing of errors, if any, will be displayed in a report which can also be saved to disk.
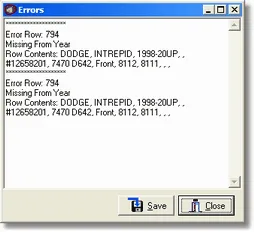
You can either Cancel the import process at this point to make corrections to the input data, or make changes to the import wizard screens. Pressing Finish will begin the import process.
A progress bar will be displayed as the application data is being imported. This process could take an extended period of time to complete, depending on the size of the file and the hardware resources available.
Import Results
When the import process is complete, the results are shown on the Import Results screen.
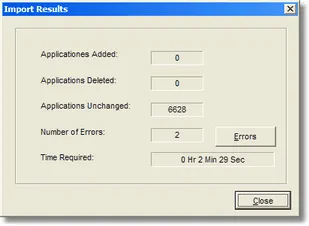
Since AceMapper is designed to be used whenever you want to deliver changes from your application data, it expects you to continually import into the same document. The first three counts on this screen report the number of changes made to the data from the previous load.
- Applications Added. The applications that were new to the document. The first time you import a document you should expect this number to represent the entire file.
- Applications Deleted. The applications that had been imported previously that are no longer in the file you imported this time.
- Applications Unchanged. The applications that were imported previously that had not changed during the current import of the file.
Note: It is possible to have Unchanged Applications reported the first time a file is imported. This happens when there are duplicate applications in the file. When the duplicate is read, AceMapper finds that it already exists in the document and assumes it was from a previous import.
Press the Errors button to see a list of problems found in the file that kept records from being imported. If desired, these can be corrected in the source file and the entire file re-imported.
Additional information about the imported data can be viewed from the Document Statistics screen.