AceAssets Server Installation (Optional)
AceAssets Server Installation
An optional server component is available to automate the import and export of digital assets.
Plan
-
Decide where to install AceAssets Server. AceAssets server can be installed on any server or workstation. If network bandwidth is a concern, consider installing on the same machine where you store your assets. AceAssets server can be installed on the same machine as Sql Server, but may impact other applications on that machine. It is necessary to have admin rights on the machine to complete the installation.
-
Decide on a user account for AceAssets Server to run under. The best approach is to use a dedicated domain account set up specifically for AceAssets Server. It is also possible to use the Local System account, though that account has admin rights. A third possibility is to use an existing domain account. Whichever option you choose, it is necessary to make sure that account has access to Sql Server with the AceAssets database and the digital assets network file system.
Prepare
-
If necessary, have your network administrator create the user account for AceAssets Server.
-
Have your Sql Server administrator add the AceAsset Server user to the server Logins and AceAssets Users. The role can be the same as for other AceAssets users.
Install Prerequisites
-
Install .Net Framework 4.0:
-
Install MSXML 6.0:
https://www.microsoft.com/downloads/en/details.aspx?FamilyID=993c0bcf-3bcf-4009-be21-27e85e1857b1
-
Install Sql Server Native Client and Sql Server Shared Management Objects:
https://www.microsoft.com/downloads/en/details.aspx?FamilyID=ceb4346f-657f-4d28-83f5-aae0c5c83d52
Install AceAssets Server
-
Download and install AceAssets Server:
https://www.aceaudit.com/AA83C4DF66/AceAssetsServer_1_0_2.exe
Install Launch Service (Optional)
-
Download and install Launch:
Configure Launch
-
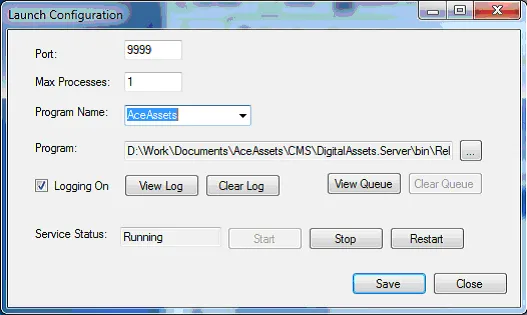
Port – 9999 will work unless that port is being used by another services. (We haven’t seen any other services using this port). You can verify the port is not being used as follows:
- From the start menu, go to Run and type in cmd
<Enter>. - In the command window, type netstat –a. This will give a listing of all active ports.
- Make sure that 9999 does not appear. If it does, change the port to one that doesn’t appear.
- From the start menu, go to Run and type in cmd
-
Max Processes – This determines how many processes will run simultaneously. For example, if two users try to do an export at the same time, if Max Processes is 2, they will both start immediately and will run at the same time. If Max Processes is 1, the first request received will run immediately. The second process will be added to the queue and will be run when the first process has finished.
-
Program Name – Type in AceAssets. (You won’t be able to select it).
-
Select to c:\program files\AceAssets Server\AceAssetsServer.exe.
-
Leave “Logging On” checked initially. Once you verify that everything is working, uncheck it.
-
Click “Start” to start the service and verify that you don’t get an error. Then stop service and click Save.
-
By default the Launch service uses the Local System account. If you want to change that (recommended),
- In the Start menu go to Run and type services.msc.
- Look for Launch in the list of services.
- If the Status column shows “Started”, right click and choose “Stop”.
- Right click on Launch and choose Properties.
- Go to the Logon tab. Select This Account and enter the Account.
- If a password is necessary for the account, enter and confirm the password.
- Click Apply. Then go to the General Tab and click Start. Make sure the service Starts and continues running.
-
Click OK and then exit Services.
-
If the machine has a firewall, make sure the port used for Launch (default=9999) is open to allow connections.
-
Get the IP address for the AceAssets Server machine:
- From the Start menu choose Run and type cmd
<Enter> - Type ipconfig. Make a note of the Ipv4 address. You will need this to configure AceAssets to use the Launch service.
- From the Start menu choose Run and type cmd
Configure AceAssets Server
-
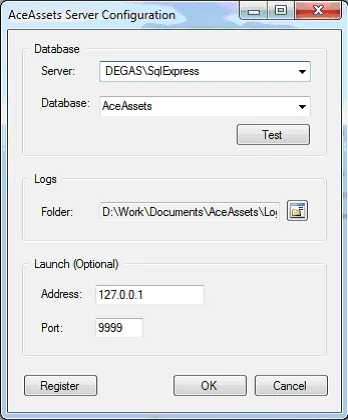
Run AceAssets Server Configuration from the Start Menu.
-
Select the Server and AceAssets database. If they don’t appear in the dropdowns, type them in.
-
Select a folder to hold log files from AceAssets Server. You will need to check this folder to see the result of your processes. Each Process Id will have its own folder under the Log folder. A log file is created each time the process runs.
-
If you have installed the Launch service, enter 127.0.0.1 for the Address and whatever number you used for the port.
-
Click Register. Use the same registration code you used for AceAssets.
-
Click OK.
That completes the installation of AceAssets Server and Launch. On your client machine, update AceAssets to the latest version. You can get it here:
Configure AceAssets
-
(Optional) Go to Administration > Configure Launch Service. Enter the IP address and Port for the Launch Service.
-
Add a user corresponding to the user the Launch server is set to run under. This user will also be used for scheduled processes.
Setup a Schedule Process
Go to File > Scheduling.
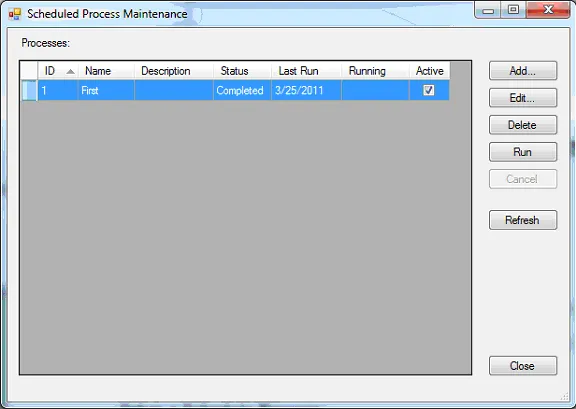
Click Add.
-
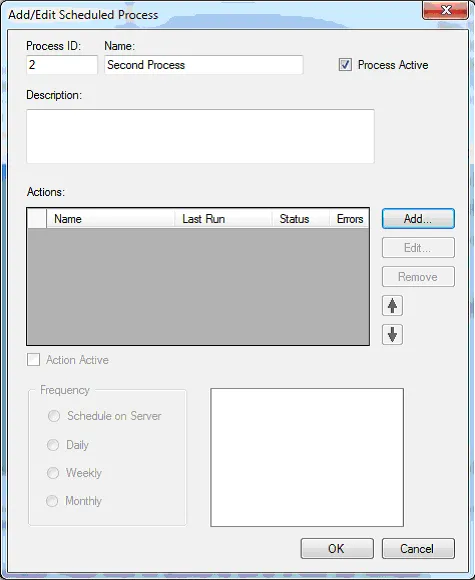
Enter a Process ID, Name and optional description.
-
Click Add to add an Action.
-
Select Import for Type and choose a catalog (choose a small catalog for testing).
-
For Frequency choose Schedule on Server for testing. Click OK.
Test the Launch Service (if installed).
-
On the Scheduled Process Maintenance screen, select the process and click Run.
-
Click Refresh. The Status should change to running. Click the Refresh button every 30 seconds or so until the Status says completed. Then to the Log folder to check the result.
-
It’s quite possible that Launch won’t work correctly the first time. Contact support for assistance in debugging the configuration.
Test Scheduled Processes
-
Run Windows Task Scheduler. (Appearance changes depending on the version of Windows.)
-
Click Create Task.
-
Give the task a name, choose the user to run under and check to run whether the user is logged in or not.
-
Create a one-time trigger about 5 minutes in the future.
-
For Actions, choose “Start a program”.
-
For the program, select
c:\program files\AceAssets Server\AceAssetsServer.exe -
In the Add arguments box enter /processid=1 (or whatever your process id is).
-
Wait for the trigger and verify the process ran by checking the log folder.