Table Box Heads
Now that you’ve seen how to format external data using a Table, let’s concentrate on one important feature of the table… the “Table Header”, or “Box Head”.
In the last tutorial we had a simple one-line table header:

But what if we wanted something more complex, maybe like this:
![]()
That box head can easily be accomplished using a “Layout Cell”.
A “Layout Cell” is a powerful Table container that allows precise placement of elements on the page. They can be used in both Table Headers and Table Data Rows. The concept is loosely based on the HTML table model in that you can span defined rows and columns and add borders and cell padding to create complex designs.
Okay, let’s create one:
-
Download the Attachment (at the bottom of this article) and save it to your desktop. Open the zip file and extract the contents to a new directory called “BoxHeads” under your “AcePrint Projects” folder (normally
C:\Users\<yourname>\Documents\AcePrint Projects). -
File > New. To create a new catalog.
-
Click on “Sections” and Right-Click to Add a Section. This will create an empty section.
-
Enter Margin values (1p6, 7p3, 1p6, 2p9). Just so you can send it to a printer if you want.
-
Click on “New Section” section and Right-Click to Add Table. This will create an empty table container for formatting external data and allow us to create a table header. Name it “Table” and set the starting Location to 0p0, 1p6 Relative to “Margin - Top Left”.
When you create a Table, three containers are automatically created: “Style Tags”, “Headers” and “Data Row”. In this tutorial, we’re only dealing with the Headers container, but every Table requires a source file.
- Press the Source File […] on that same page. This will bring up a Windows File Open dialog. Select “SampleData.txt” from the BoxHead folder you created in step 1. Select “Has Field names” and Press OK.
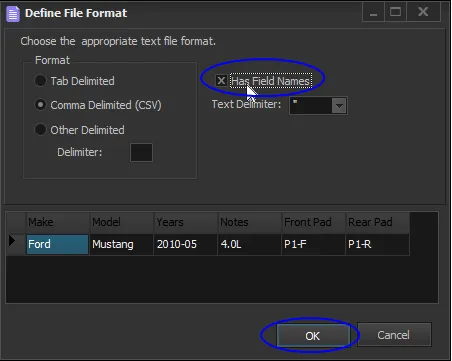
We aren’t going to use the data in this tutorial, that is why there is only one row in the file. But we still need to define the table dimensions…
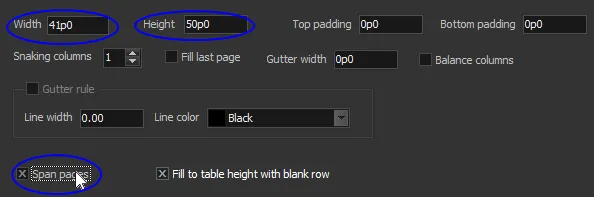
- Enter Width 41p0, Height 50p0, Check the Span Pages option.
None of this is new. We’ve simply created an AcePrint document with a Table-driven section. Now let’s create the Box Head for that table.
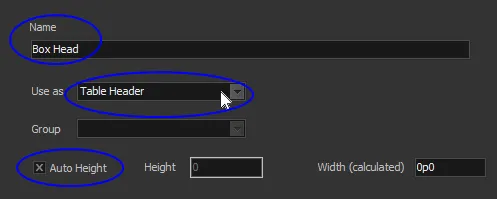
- Click on the Table “Headers” container and Right-Click Add. This will create a new header. Name it “Box Head” and Use as “Table Header”. Select “Auto Height” to indicate that it will take its height from the total of its sub-elements.
This only creates the container. Now we need to give it some static text. Since we are going to have two rows in the header, we need to use a Layout Cell to set that up. Here is the layout again, showing the row and column numbers.

- Click on “Box Head” and Right-Click to Add a “Layout cell”. Change the Name to “Layout” and set the Width to “41p0”. A new layout cell defaults to two rows and two columns with columns determined by percentages of the table width. But we want two rows and 4 columns with absolute widths as shown above.
If you set the row Size Type to “Auto”, the height will take on the combined height of the sub-elements. This is often better than setting an absolute Row height in the layout since it allows word-wrapping and cell padding to determine row height.
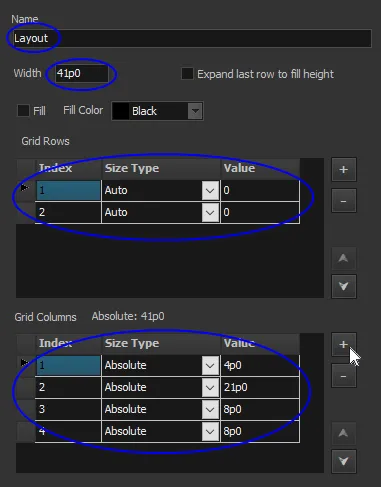
We will use “Absolute” Size Type for the column widths, however. This is generally the preferred approach. As you enter column widths, a running total is shown above the grid. In this case, it shows “Absolute: 41p0” which matches our Layout Width set above. If this value is more than the Layout Width, an error message will be shown when you save or attempt to exit the page.
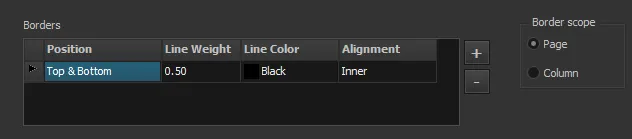
- Press the Plus Sign (+) and add a “Top/Bottom” Table Border. Set the Line Weight to “.5” points. This will put a border the width of the Layout (41p0) above and below the Box Heads.
At this point we have a layout defined, but no heading text has been placed in the layout structure yet. Let’s add TextBoxes to the Layout container and place them in the proper rows/columns.
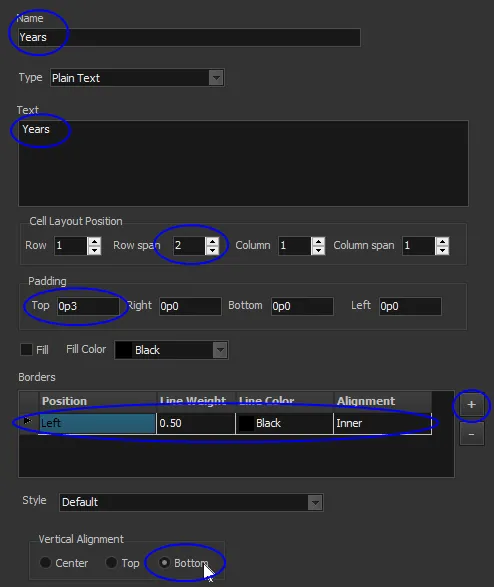
- Click on “Layout” and Right-Click to Add a TextBox cell. This will add an empty TextBox for the “Years” heading. One thing to note is that we start in row 1 and span the two rows, aligning the text at the bottom. The reason we do this is so that the “Left” border applies to both rows.
Repeat this step for the “Application” column, but set its Column value to “2”. (TIP: You can use the copy/paste feature to duplicate the above TextBox and then change the Name and column).
Next, we want to have a head span the two front and rear columns. This is easily done by setting the Column span value to “2”. For the borders we want both Left and Right as shown below (the bottom border will be handled by the Front and Rear cells):

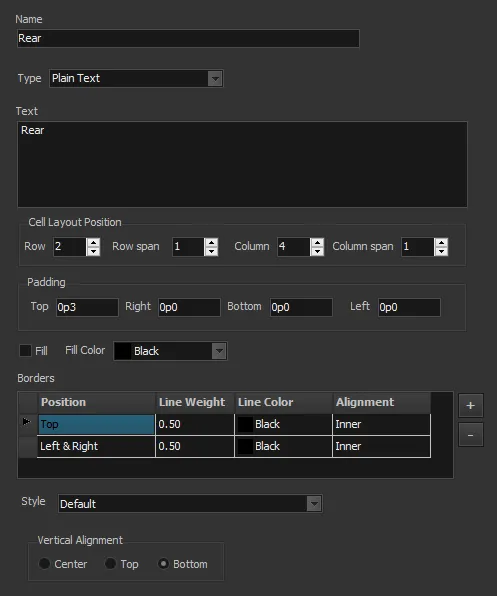
Next, we need to create two final Text Boxes, one for the Front and one for the Rear heads. These will both be on the second row, “Front” in column 3 and the “Rear” in column 4.
They will both have Top and Left borders. The “Rear” will also need a Right border (which can be combined with the Left Position as “Left & Right”). The top Padding will be 3pts.
Here is the a screenshot of the Rear text box definition:
- Press Create PDF to generate the final Box Head.